

This guide focuses on roof to wall straps wind mitigation and the exact photo proof inspectors use so your credits don’t get downgraded.
Roof to wall straps wind mitigation credits can meaningfully reduce the wind portion of a Florida homeowners premium—but this category is also one of the easiest to get downgraded. Not because your house is “bad,” but because the inspection is ruled by two realities:
- The form asks for the weakest roof-to-wall connection present, and
- If the inspector can’t clearly photograph it, the report often gets pushed to a weaker category.
Florida’s OIR wind mitigation form spells out that the question is the WEAKEST roof-to-wall connection. That wording matters more than people realize.
This post breaks down what toenails, clips, and straps really mean on the form—and the exact photo-proof rules that make your credits “stick” through underwriting review.
What “roof-to-wall attachment” actually means (simple explanation)
Roof-to-wall attachment is how your roof framing (trusses/rafters) is mechanically tied to the top of your exterior walls. In hurricanes, uplift forces try to peel the roof off the structure. Stronger connections reduce that risk.
Florida’s own mitigation guidance encourages strengthening the roof-to-wall connection with clips or straps and notes that inspectors document these features on the Uniform Mitigation Verification Inspection Form.
The three main categories: toenails, clips, straps (and the “weakest link” rule)
1) Toenails (weakest)
Toenails are nails driven at an angle through the truss/rafter into the top plate. The OIR form lists “toenails” and clarifies that metal connectors that don’t meet minimum conditions can also fall into this weaker category.
2) Clips (stronger than toenails)
Clips are metal connectors attached to the truss/rafter and the top plate (or bond beam), typically nailed on one side (or sometimes both sides for specific clip types).
3) Straps / wraps (stronger if properly installed)
Straps (often called single wraps or double wraps depending on how they wrap and fasten) generally provide a stronger tie because they connect more of the truss/rafter to the wall assembly with more fastening. The exact classification still depends on the form criteria and what can be verified.
The rule that surprises homeowners
The form isn’t asking “what’s the best strap you can find.” It’s asking the weakest connection type present. One weak section can drag the whole category down.
That’s why roof to wall straps wind mitigation is won or lost on (a) finding the weakest area and (b) documenting it clearly.
8 critical photo-proof rules (how to make it count)
1) Don’t photograph the “best strap.” Photograph the weakest area.
If one section has straps and another has toenails, the weakest section controls the category. The inspector should document multiple areas, not one “pretty” connection.
Homeowner tip: Ask the inspector to sample several attic locations, not just the easiest spot near the hatch.
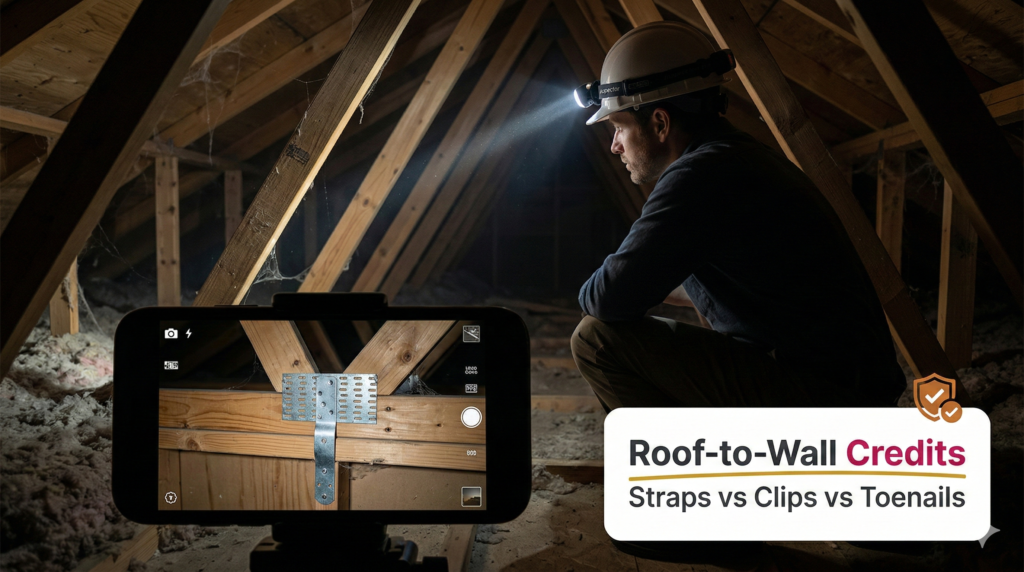
2) Get two shots per connection: context + close-up
Underwriting hates mystery photos.
Minimum photo set:
- Wide/context shot showing the truss/rafter and wall area
- Close-up showing the connector and fasteners
This aligns with state guidance that mitigation features must be documented with photographs.
3) The fasteners matter (and must be visible)
A strap that’s barely fastened or incorrectly nailed can be treated as weaker than you think. If fasteners aren’t visible, the inspector can’t support a stronger category.
Practical move: Better lighting. Headlamp + flash. No dark, blurry photos.
4) Insulation is a credit killer if it blocks the connection
If insulation hides the joint, the inspector can’t prove what’s there. This can force a weaker classification or “unknown” depending on conditions.
Homeowner tip: You don’t need to remodel the attic—just make it accessible and safe to see the connections.
5) Don’t confuse random metal with a qualifying connector
People see metal and assume “clips.” But the OIR form warns that metal connectors not meeting minimum conditions can fall into weaker categories.
Translation: The connector type and installation details matter.
6) Avoid the “single photo, single location” trap
One photo proves one location. It does not prove the whole house.
If you want roof to wall straps wind mitigation credits to hold up, the photo set should show a pattern: multiple connections across different roof sections.
7) If you retrofitted straps, paperwork is your insurance policy
If straps were added later (retrofit), documentation helps:
- permit records (when applicable)
- contractor invoice describing scope
- before/during/after photos (best)
Citizens’ documentation guidelines emphasize providing clear documentation to verify mitigation features.
8) The “one PDF evidence file” prevents downgrades
Make a single PDF that includes:
- labeled photos (Roof-to-wall attachments)
- any retrofit permits/invoices
- a short summary page listing what’s included
Florida’s CFO guidance emphasizes that inspectors document features on the uniform form and must include accompanying photographs.
This is the difference between a credit that stays and a credit that gets challenged later.
What to do if you don’t qualify (or can’t prove it)
If you find out your home is mostly toenails or unverified connectors, you have two smart options:
- Plan the upgrade at the right time (often alongside other work), and
- Document the upgrade properly so the next inspection reflects the improvement.
Florida’s mitigation guidance specifically encourages adding clips or straps as a roof-to-wall improvement.
Investor note (why this matters for rentals and flips)
For investors, roof-to-wall documentation isn’t “paperwork”—it’s operating cost control. When credits stick, you can reduce insurance friction and stabilize premiums. For property upgrade sequencing and ROI planning:
https://jreyesinvestments.com
GC coordination (when multiple trades/permits are involved)
If upgrades involve structural connectors, reroof work, opening protection, or permit coordination, one coordinated plan prevents scope gaps and delays:
https://toltcgc.com
To protect your discount, treat roof to wall straps wind mitigation like evidence: multiple attic locations, clear fastener photos, and a labeled PDF that underwriting can’t downgrade.
Next step
If you’re trying to maximize credits, remember: roof to wall straps wind mitigation is decided by the weakest connection—and the photos that prove it. If you’re in Central Florida, Roof Roof can help you understand what you have, what you’re missing, and how to document it cleanly so credits don’t get downgraded.
Sources (external)
OIR-B1-1802 form (PDF): https://floir.gov/docs-sf/default-source/property-and-casualty/oir-b1-1802.pdf
Florida CFO premium discounts guide (PDF): https://www.myfloridacfo.com/docs-sf/consumer-services-libraries/consumerservices-documents/understanding-coverage/consumer-guides/premium-discounts-for-hurricane-loss-mitigation.pdf
Citizens documentation guidelines (PDF): https://www.citizensfla.com/documents/20702/31330/Wind%2BMitigation%2BFeature%2BDocumentation%2BGuidelines/95ad04f0-7e78-4fa1-b745-73ae01e409ac
Florida mitigation page (roof-to-wall clips/straps): https://myfloridacfo.com/division/ica/planprepareprotect/Mitigation